I built the B-model of 9395 only with the parts from 9395 and 8293 power functions set except from two small ligths from LEGO system sets. This is my first Technic set in years (I had a small green motocycle from '98), so I can say, that I don't have any Technic spare parts. Here's a picture of finished model. It has motorised winch and lift mechanism with control switch in the left side of truck and lights form 8293.

When I had completed the B-model after about 3 hours, I thought that it lacks something and doesn't look right. So I started to rebuild it. First I tried to change the looks of the cabin, afterwards I decided to add the motor, as I had it. So the re-build took me about 9 hours, mostly because I had to scramble for parts in the completed sections and rebuild what I have completed.
I did a lot of changes to the official model, but the chassis and lift mechanism has remained the same. Maybe I have removed some pins or connectors, from the set, so if you have spare parts, just use what you see in the pictures. If this and 8293 is your only set - just take your time and you will find where to get the bits, anyways, there are a lot of design changes, that are not crucial.
1) So, I took my time and wrote comments on official 9395 B-model manual here. You just build the car as in the manual and follow my comments of not performing or ingoring actions, so you get to a starting point of rebuilding, where the car looks like in theese pictures.
1) So, I took my time and wrote comments on official 9395 B-model manual here. You just build the car as in the manual and follow my comments of not performing or ingoring actions, so you get to a starting point of rebuilding, where the car looks like in theese pictures.
Left side

From top

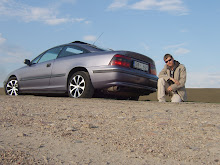
Right side

Front

Rear

Underside

a) Follow the manual till page 19, book1. Now don't add two latter black pins in each side that are inserted in grey-9 beam from action 7 (a7) in page 19 (p19), book 1 (b1).
b) Don't add the left side (driver side) red angled beam from a8, p19, b1. Continue building following the manual.
c) Don't build left side from a13, p23, b1 till a17, p25, b1 (including). In a20, p28, use small black pin instead of long blue. Continue as in manual.
d) Don't perform a22, p30, b1. Continue as in manual.
e) In a30, p38, b1 replace the top black pin with longer blue one. Continue as in manual.
f) In a6, p58, b1, replace the two blue cross-axle-pin with black pins. Continue.
g) don't perform anything from p60 and p61, b1 (the winch). The part from p62-p65 remains the same. As well, don't perform actions in p66 and p67, b1. Add the built part as shown in a37, p68, b2. Continue.
h) when you get to the lift mechanism building a13,p77, b2, remove the grey-5 axle (that's a hard task) and the small red beams attached to it. Later, you can remove the chair-like part made from p70 to p72, b2, it will be easier to make modification if it is removed. Remaining lift mechanism stays the same, follow the manual.
i) don't add the axle/pin cross block added in a40, p81, b2 and a43, p84, b2 and don't perform a44, p85, b2. Don't add the top black pins in a45, p86, b2 and replace it with longer blue pin. Don't add the axle pins from a46, p87, b2. Continue.
k) don't add the red axle-2 in a61-2, p102, b2. Don't add the long blue pin in a62, p103, b2. Perform a63, p104, b2.
l) don't add the red angle element in a64, p105, b2, add only the grey-3 axle. Stop building at p108, b2.
m) resume at p122, b2. Don't perform a9, p126, b2. Instead use grey pin to connect the black-3 beam. The mudguard design and placement will remain the same, I didn't add the mudguard at this point, but you can do it, if you want, guess it doesn't matter.
n) the chair connection to chassis will remain the same, but it wil be easier to add the modified chairs if you don't add the grey axle-bush connectors, as in p128, b2.
o) ignore everything from p129, b2 till p134, b3. Add the red angle beam as in the a81, p134, b3, but don't add the long blue pin.
p) ignore everything from p135, b3 till p144, b3. Construct the left front mudguard in the same way as the rigth one, but don't add it to chassis.
q) Don't add the black pin in a92-1, p150, b3. Don't add the orange light brick. In a92-4, p.151, b3, use only one long blue pin, the second can be replaced with black pin. Don't add the grey half-pin. You can finish the panels, but don't add them to the car, as they are added later.
r) ignore p156, b3 till p158, b3.
s) build the "radiator" as in manual, place it one stud lower (as in pictures later) but don't add it to the car. Replace the black 1x2 brick in a2, p159, b3 with the orange transparent one. Don't add the black pins as in a5, p161, b3.
t) ignore p163, b3 till p169. Construct both doors, but don't add them to the car. Ignore p176, b3 till p180, b3.
u) add the black-9 beams as in p180, b3 and perform everything as in manual till p187, b3. Exception - in a11, p186, b3 you might run out of black pins, if you don't have spare parts. Just use blue cross-axle-pins instead, this change will have no effect after second red-11 beam is added.
v) add the grey-11 beam as in a109, p190, b3, perform other actions later, when the car is rebuilt.
So, now you should mainly follow the pictures, if you are experienced enough, it should be all you need, although the pictures might not show all the actions and the text might reference some actions from official manual. Sorry, for some mess, I did this manual over a long time and might have forgotten smthn or told twice.
Nevertheless, I did re-check everything to make sure, I can re-build it myself.


Connect two red angles, add grey-3 axle and conectors from left side and slide it on the grey-5 axle as in the picture.

Now add from left side the winch and improvised blocker and other parts.

3) now, let's add a number plate in front of the truck. Slide the two sides of number plate holder through the bottom of the winch mechanism and add the number plate.


4) front lights are almost like custom. I made some design changes, moved the connection bt 1 and used one spare orange triangel-light from Lego-Racers set. If you don't have it, just use round lights that are plenty in the 9395 set.


5) now, I built the salon of the truck. I didn't like the original seats, so I made them more detailed, but, using the same connection to the chassis as original model.


At this point you can add the lights from set 8293 as well. Place the 2x2 brick that splits wire on the end of the engine. We'll deal with the wires later.

Then connect the 'radiator'. It should fit perfectly opposing the original truck, that had a hole in the nose, to operate the winch blocker.


7) let's add steering wheel and dials.


8) now, add front pillars of the cabin. As I didn't had required connections, I couldn't connect them so they don't move. When you add lights from 8293 as I showed previously, and connect these pillars to the back of the cabin via roof, then the movement is less noticable.


Add the "mirror" bricks from original car at the end of the axle.

9) The battery box will fit perfectly behind the seats, connected to the "roof pillars" with two black pins. For roof pillars use the angled beam with Lego Technic stickers, adding it to the front wheel mudguards with blue connecting bush w.friction / cross axle (part nr.4206482 if you look at the list of parts in the manual).


10) now let's move to lift mechanism. Instead of red angle element added in a64, p105, b2, I added a red connector and grey-5 axle and a bush for cross axle.

Moving to the part, that starts in p108, b2, I switched the direction of ending black 1x2 beam so they are upwards, then I added a grey pin to the black straight angle element and removed one black pin from the left side. Also, don't insert the black pins in the 1x2 beams.


and perform the action 73 from page 119. Afterwards, you add other bits seen here (black-4 axle and grey-3 axle).

so the construction is more rigid.


12) now, let's add the engine. You have to connect the grey-5 axle with black-4 axle. Add the black triangle beam as in manual a53, p94, b2.

Now construct the engine connection as in pictures. The engine will give its power through grey-5 axle. Add everything to the red angle beam in the right side of the truck and add the torque limiter gearwheel to the black-4 axle and the small gear from 8293 to the engine axle.


Then make two "holders" with parts seen here. If you have spare parts, you can probably do it differently, as this doesn't look very good.


Now put back the bricks in left side of the truck, you had to remove, to fit in engine. Add second connector and grey-11 beams.


13) it's time to add lamps in the back and number plate holder. This construction will fix the gears in place, so you can start operating the functions of the truck using the motor. the construction can be varied according to available spare parts and design preferences. I used a spare red light from my old Lego system sets.


The number plate:


14) now we can proceed to the roof construction. You should start from right side as in the left side you will have to connect the engine wire via switch from 8293 set. Follow the pictures. The left side is similar, with the exception that it has the small 1x2 brick (I removed it from radiator and replaced it with the orange transparent one in the radiator construction).


Add the right side of the roof as in the picture and add the red angle element on top of steering axle.


Construct the headlights.


After connecting the headlamps, connect the front pillars to the roof.


15) connect the engine wire end to the switch and use other parts in the picture, to connect the switch to the black-11 beam. Wrap the wire of switch around the roof supporting black-4 axle and connect both the switch wire and light wire to the battery box.


16) put the engine wire under the red angle beam and add the side panel. As I told before, I removed most of the connecting parts from side panel construction, it is enough with one. Add the yellow half-bush to the grey axle before adding the panel.


17) add the doors. As far as I remember I didn't remove anything from the doors.


Here are some pictures of finished model, first one is darker, so you can see the lights:


Thanks for reading!


18) put together the rear mudguards.


19) add the control gearwheels and tires and it's ready. Enjoy!


Here are some pictures of finished model, first one is darker, so you can see the lights:


Thanks for reading!


Nav komentāru:
Ierakstīt komentāru